08 October 2013

This Blog Has Moved...

We-have-Moved-sign-1334841192

For various reasons, some of which are covered in this post and others which are not, this blog has permanently moved to:


The RSS feeds have changed as well:

Main Feed

 Comments Feed

This blog will remain active for historical purposes though I won't publish any new posts here.  Please update any saved links and/or feeds accordingly.

Thank You!

06 October 2013

Time for a Blog Makeover

Since my first blog post nearly 8 years ago, I have been using blogspot.com as my one and only blogging engine. For the most part, it has served me very well. Although the web-based editor isn’t bad, I’ve always preferred to use Windows Live Writer as my authoring tool of choice. The drag-n-drop customization features within blogger.com made customizing my blog site a snap and there were more templates available than I could possibly ever need. All in all, I’ve not had much to complain about over the past several years of blogging.
However, I have been having an issues for a while now that I can’t seem to find a resolution for. For some reason, over the past couple of months, any time I attempt to make changes to my blog site template, I always get an error message when I attempt to save the changes. There is no explanation for the error, simply the following message:

image

As one might imagine, this has become quite annoying. So this has motivated me to look into WordPress. Something I’ve taken a quick look at in the past but never gave it much time. So, in the short time I’ve spent working with WordPress over the past day or so, I’ve really come to like it. I especially like the community that has built up around, and in support of, WordPress. There are plugins and widgets for just about everything you can dream up for a blog site.
Armed with my limited knowledge and experience with WordPress I decided to create a new (and hopefully, improved) version of my blog at blog.devmatter.com. This new blog will, at least for the time being, mirror my existing blog site at devmatter.blogspot.com.
Although some differences may be more subtle than others, I am hoping for a cleaner, easier-to-navigate site.  Here are a couple of simple screenshots illustrating the basic differences in colors and layout:
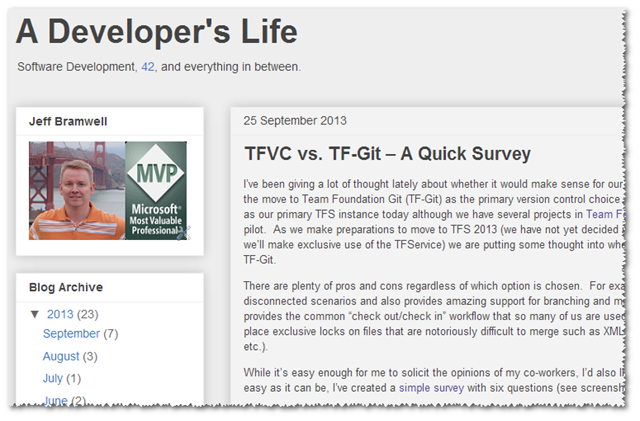
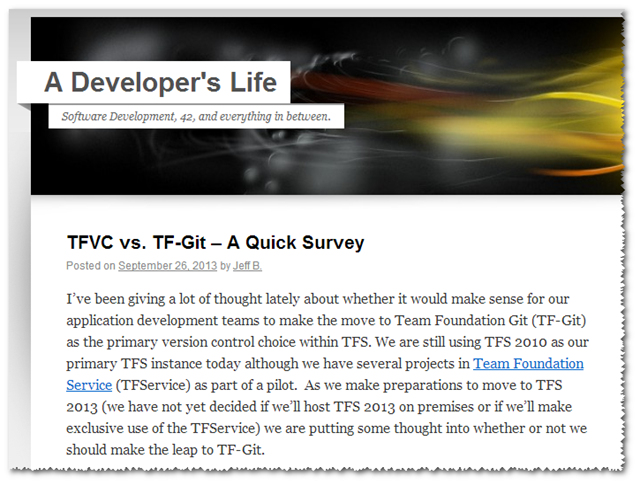
The “Old” Site:image
The “New” Site:image
So if you have the inclination, please take a look around and give me your thoughts. What looks good and what doesn’t? Assuming this all works out for the better I will make a permanent move to the new site (redirecting the old site appropriately).

25 September 2013

TFVC vs. TF-Git – A Quick Survey

I’ve been giving a lot of thought lately about whether it would make sense for our application development teams to make the move to Team Foundation Git (TF-Git) as the primary version control choice within TFS. We are still using TFS 2010 as our primary TFS instance today although we have several projects in Team Foundation Service (TFService) as part of a pilot.  As we make preparations to move to TFS 2013 (we have not yet decided if we’ll host TFS 2013 on premises or if we’ll make exclusive use of the TFService) we are putting some thought into whether or not we should make the leap to TF-Git.

There are plenty of pros and cons regardless of which option is chosen.  For example, TF-Git is very well suited for disconnected scenarios and also provides amazing support for branching and merging code.  On the other hand, TFVC provides the common “check out/check in” workflow that so many of us are used to today.  It also provides the ability to place exclusive locks on files that are notoriously difficult to merge such as XML files (e.g. workflow, SSIS packages, etc.).

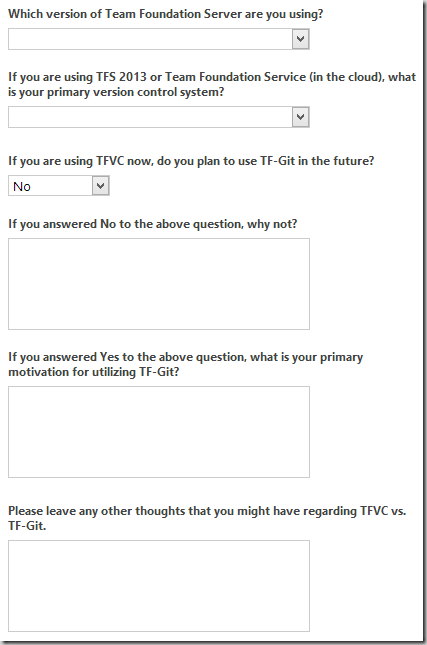
While it’s easy enough for me to solicit the opinions of my co-workers, I’d also like to get your opinions.  To make this as easy as it can be, I’ve created a simple survey with six questions (see screenshot below).

So, please take a moment and take the survey.
 

Click to Take Survey

We will keep the survey open for about two weeks.  Once the results have been collected, I will share them on this blog.

UPDATE: The final survey results have been posted here.

24 September 2013

200GB Option for SkyDrive

If you’ve been waiting for the option to buy more than 100GB of storage on SkyDrive, your wait is over.  You can now buy an extra 200GB of storage space for $100/year. As you can see in the screenshot below, the space you purchase is added on to whatever you already have (in the Total Space column).

The current price per GB is $0.50/year vs. ~$0.60 per GB/year for Google Drive.  Not a huge difference but a little less.  Though Google Drive makes up for part of this by providing the first 15GB free (vs. 7GB for SkyDrive).

image

Also, if you buy one of the new Surface 2 devices, you will get 200GB of SkyDrive storage free for two years.

19 September 2013

TFS 2013 Power Tools Released

As of today, you can download the just-released Team Foundation Server 2013 Power Tools (compatible with TFS 2013 RC). If you’re not familiar with the TFS Power Tools, and you spend any amount of time working with TFS on a day-to-day basis, I highly recommend you check these out.
This release is comprised of four separate downloads:
Navigate to the above links to get more details on each of the available tools.

16 September 2013

Removing the Barrier to Entry for Windows Phone Development

Until recently, if you wanted to develop for Windows Phone, and actually run your apps on your phone (as opposed to the emulator) you had to register for a $99 (USD) Windows Phone developer account.  This cost has always been a substantial barrier to entry for many would-be (Windows Phone) developers.  That is, until recently.

Recently, two things have changed to make this much better.

First, the $99 registration amount has been changed to $19 (annually).  This price is much more reasonable for most people (though free, it could be argued, would be even more reasonable :-).  The $19 price was originally a temporary promotion but, according to a tweet from Todd Brix (General Manager of Windows Phone Apps and Store Team), Microsoft is keeping the price at $19.

image

Second, Microsoft made a change that I hadn’t noticed until recently.  Originally (before ~August 6th), you couldn’t deploy apps under development to your phone unless you had registered for a Windows Phone developer account (back to the $99/year cost again). Now Microsoft has made a change that allows any Windows Phone developer to push up to two apps to a single phone with no cost. If you do have a Windows Phone developer account, you can push up to 10 apps to as many as three phones.

Combining these changes along with Microsoft’s outstanding development tools give developers practically no reason not to developer for Windows Phone.

11 September 2013

Visual Studio 2013 RC Released

logo_visualstudio_100x100_1This post is a couple of days behind but I thought I’d go ahead and put out a few links to help spread the word a little more :-). 
As of September 9th, Visual Studio 2013 RC (Release Candidate) was made available for download on the Visual Studio web site.  This is a “go live” release which means you can run Visual Studio 2013 RC in a production environment and there will be a supported upgrade path to Visual Studio 2013 RTM.
Visual Studio 2013 is expected to RTM along with Windows 8.1 GA (General Availability) which is slated for October “18th”.
To get an idea of what’s included in the latest version of Visual Studio, check out these posts:
The following software is now available for download (here):
Visual Studio 2013 RC
  • Visual Studio Ultimate 2013 RC
  • Visual Studio Premium 2013 RC
  • Visual Studio Professional 2013 RC
  • Visual Studio Test Professional 2013 RC
  • Team Foundation Server 2013 RC
Visual Studio Express 2013 RC
  • Visual Studio Express 2013 RC for Web
  • Visual Studio Express 2013 RC for Windows Desktop
  • Visual Studio Team Foundation Server Express 2013 RC
Additional Software
  • Team Explorer
  • Team Explorer Everywhere for TFS
  • .NET Framework 4.5.1
  • Agents for Visual Studio 2013
  • IntelliTrace Collector for Visual Studio
  • Feedback Client for TFS
  • Remote Tools for Visual Studio 2013
  • Visual C++ Redistributable for Visual Studio 2013
  • Visual Studio Shell
  • Visual Studio SDK
  • Multibyte MFC Library for Visual Studio 2013 RC
  • Modeling SDK for Microsoft Visual Studio 2013 RC
  • Microsoft Build Tools RC
Note that Visual Studio 2013 RC is not compatible with Windows 8.1 Preview.  You will need to install Windows 8.1 RTM for use with Visual Studio 2013 RC.
If you run into issues, have questions, or ideas, you can submit/ask them here:

Straight to Desktop in Windows 8.1

If you find you spend more time in the Desktop than you do the Start Screen then you may want to consider setting the desktop as the default start mode for your PC.
To configure your PC to go to the desktop when you logon or close all apps on a screen, follow these steps:
1. From the Start screen, start typing “Taskbar” and select the “Taskbar and Navigation” option from the list.  This will display the Taskbar and Navigation properties dialog.
image
2. Click on the Navigation tab.
image
3. Check the “When I sign in or close all apps on a screen…” checkbox.  This option instructs Windows to take you directly to the desktop when you sign in or if you close all apps on a screen.
4. If you would like an experience that is somewhat Windows 7-like when you click on the Start button (or press the Windows hardware button), i.e. display the Apps view instead of the Start screen, then check the “Show the Apps view automatically…” checkbox.
image
5. Click OK.
Check out the other options in this properties dialog for other features that you might find useful.

TFS Build Manager for VS 2013 Updated

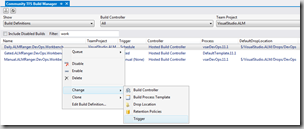
screenshotToday, the Community TFS Build Extensions on CodePlex released an update to the Community TFS Build Manager VS2013 add-in. If you spend any time at all managing multiple build definitions, build results, and/or build servers, then you need to give this add-in a try.
Updates & fixes include:
  • NEW - Search and replace workspace mappings
  • NEW - Filter Build Definitions via text
  • NEW - Access build logs in web access
  • NEW - Build Duration and Agent Name columns
  • NEW - Friendly Trigger Names
  • NEW - Easily queue high priority builds
  • NEW - Clone to Project
  • FIX - Case insensitive comparisons when changing drop location of existing builds
  • FIX - Invalid Project Reference issue
  • FIX - Only change & save the new process template only if it's a different one
  • FIX - UI typo in Change Drop Location screen
The current feature set include:
  • View and sort Builds and Build Definitions across multiple Build Controllers and Team Projects
  • Bulk operations on Build Definitions
    • Change Build Templates
    • Queue
    • Enable
    • Disable
    • Delete
    • Edit
    • Set Retention Policies
    • Change Drop Location 
    • Change Build Controller
    • Change Build Triggers
  • Clone Build Definitions (includes workspace mapping translation)
  • Create a DGML image of your Builds and Controllers
  • Bulk operations on Builds
    • Delete
    • Set Build Quality
    • Open Drop Folders
    • Retain Indefinitely
    • Stop/Cancel
A standalone Windows Application is also available as part of the Community TFS Build Extensions CodePlex project.
Download the Community TFS Build Manager for Visual Studio 2013 here.

20 August 2013

Windows Phone App Studio–My First App

Recently, Microsoft made available the Windows Phone App Studio (beta). The purpose of the Windows Phone App Studio is to make it simple for anyone with a great Windows Phone app idea to create, test, and share an app without installing any development tools.

Getting Started

You can sign up for a free account at the link above and give it a try for yourself. Note, however, that you may have to wait up to a day to get a registration code.
Once you’ve signed in, click on the Create link to get started with building your first app. You will have the option to start with an empty app (not recommended for your first time using the site) or one of (currently) 19 prebuilt templates.  The templates are geared toward marketing your business, wedding invites, promoting your favorite band, etc.
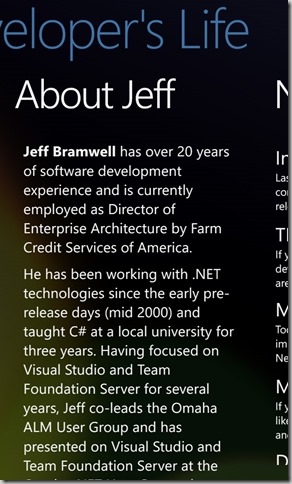
For my first app, I decided to create a simple news reader tied to my (this) blog. I name the app A Developer’s Life. For this app, I started with the “Our Company” template.

App Information

When you first create an app you can give it a Title (i.e. Name), Description, and a Logo.  For example, here’s what my initial app configuration looks like in the App Studio:
image

App Content

The next step is to define the content of your app, including Data Sources and Sections.
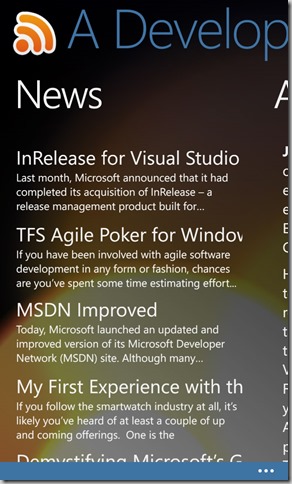
Data Source provide content for your app whereas Sections provide the pages for your app.  In my case, I have two data sources providing content for two pages (within a panorama):
  • newsds – a “news” data source tied to the RSS feed of my blog.  This provides the main content for the app.
  • aboutus – this data source allows you to store HTML which can then be data bound to a page element.  I use this to provide a little information about myself in the app.
The screenshot on the left (below) shows how the newsds Data Source is displayed on the page and the screenshot on the right shows how the aboutus Data Source is displayed.
wp_ss_20130820_0001      wp_ss_20130820_0002

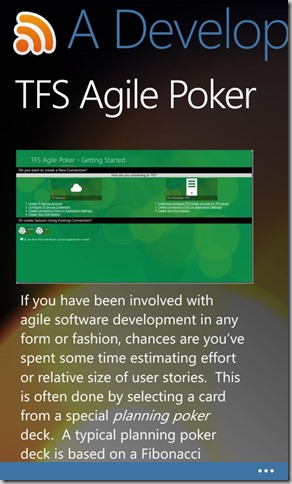
Tapping on a specific news item about will display a details page as shown below:
wp_ss_20130820_0003

Application Style

There are also settings that determine the app’s background (a specific color or an image), the foreground color, and the application bar color.  You can also specify the type of tiles to implement with your app using the Cycle, Flip, or Iconic templates.  Splash and lock screen images can be selected as well.

Generating the App

The final step is generating your app.  Once you have everything setup and configured just the way you want it, you click on Generate and sit back and wait about 30 or 40 seconds for the app to build.  Once the app has been built, you will receive an e-mail message that can be used to download the app.  A QR code will also be displayed that can be scanned with your phone for quick and easy downloading as well.
Before you install an app created by the Windows Phone App Studio you must first install the provided certificate.  A link to the certificate is provided in the e-mail that is sent to you upon completion of the app build.
Once the app has been downloaded and installed on your phone, you can use it pretty much like any other app.

Wanna Try My App?

If you’d like to give my app (as seen above) a go, then click here to download and install A Developer's Life.  You must have the Windows Phone App Studio account to be able to access the shared application.
image

But Wait, There’s More!

Although the Windows Phone App Studio gives you a quick-n-easy way of getting basic apps up and running (and shared), you can only go so far with the App Studio.  If you find you’re running into limitations that you simply can’t get around (and you will if you want to implement any non-trivial features – e.g. notifications) then you can download the source code for the app and open it in Visual Studio.  Once in Visual Studio, you can continue to enhance your app as you see fit.  Nice!
All that said, there are still quite a few limitations to the App Studio.  However, this is a brand new offering from Microsoft and it is still in beta.  I suspect they will add many new features and capabilities as feedback comes in.  And, speaking of feedback, you can provide your own feedback about the App Studio here.
You can read a little more about the Windows Phone App Studio beta here as well.

17 August 2013

InRelease for Visual Studio 2013 Preview

InReleaseLast month, Microsoft announced that it had completed its acquisition of InRelease – a release management product built for Microsoft’s Team Foundation Server (TFS) by InCycle Software.
InRelease for Visual Studio 2013 Preview is the essential suite of release and deployment tools available to automate deployment of applications across the desktop, the server, and the cloud.
Essentially, InRelease provides your teams with a continuous delivery solution that automates the release process for TFS.  Based on a business workflow, InRelease can provide you with faster and simpler deliveries of your applications to multiple environments, including production.
A trial version of InRelease is now available for Visual Studio 2013 Preview.  See the download link below.
A quick note on licensing… Release management with InRelease for Visual Studio 2013 Preview requires Ultimate 2013 Preview, Premium 2013 Preview, or Test Professional 2013 Preview. The deployment agent will continue to be licensed separately per target server.
Quick Links:

TFS Agile Poker for Windows 8

If you have been involved with agile software development in any form or fashion, chances are you’ve spent some time estimating effort or relative size of user stories.  This is often done by selecting a card from a special planning poker deck.  A typical planning poker deck is based on a Fibonacci sequence (e.g. 0, 1, 2, 3, 5, 8…) though the sequence is sometimes modified after 13 for even numbers (e.g. 20, 40, 100).  This process works fairly well when all participants are located relatively close to each other (i.e. in the same room).  What if the team members are geographically separated?
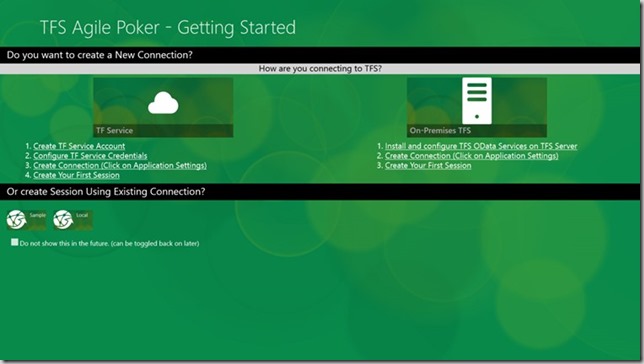
It just so happens that a fellow Visual Studio ALM MVP, Mike Douglas, has recently released TFS Agile Poker for Windows 8 that works with Microsoft’s Team Foundation Server (or Team Foundation Service).
TFS Agile Poker is a free cross-platform tool for distributed and co-located teams to point (i.e. estimate) your Team Foundation Server backlog. TFS Agile Poker can be used with Team Foundation Service or or your on-premises Team Foundation Server 2010 or 2012 installation using theTFS OData Services.
TFS Agile Poker
Microsoft’s Brian Keller selected TFS Agile Poker as his pick of the week in This Week On Channel 9 (starting at 14:14 in the video).
The app is free and is currently available for Windows 8 with plans for Windows Phone, Web/HTML5, Android, and iOS.  Read more about this app here.
View in Windows Store

31 July 2013

MSDN Improved

Today, Microsoft launched an updated and improved version of its Microsoft Developer Network (MSDN) site. Although many developers rely upon web-based search results to get them to the content they need within MSDN, the site is also used by many (sometimes newer) developers as an entry point into the vast set of developer resources provided by Microsoft. You may also visit MSDN simply to catch up with what’s new in development technology.
With that said, there were a few things that Microsoft targeted with this update (as taken from Brian Harry’s post on this subject):
  • Simple:   We designed the site to help developers get started with Microsoft more easily, and get them to the information that they need.  We heard from the community that finding the right information, often spread between different locations, could be challenging.  The Microsoft Developer Network addresses that feedback by providing a single point of entry for all developers.
  • Relevant: We want to meet developers where they are and talk with them on their terms.  With the Microsoft Developer Network, an iOS developer, for example, can quickly understand the opportunity available from our platform and then easily navigate to the educational or technical content he needs to get started.
  • Community Driven: Microsoft has an incredible developer ecosystem, and we wanted to provide even more opportunity for the community to engage with us and with each other.  We designed the Microsoft Developer Network with that in mind creating a “Perspectives” section with community blogs, an integrated social feed, and a “Connect” area that allows developers to tell their stories, get advice and connect with us directly.
The site launch happening today is for English-based geographies, but this is just the beginning of a phased worldwide launch.   Expect to see the global launch roll out over the next few months!
I for one am excited to see these updates to MSDN. I rely heavily on the content provided by MSDN and any enhancements that make it easier, faster, and more accurate when locating specific information is a big win as far as I’m concerned!

24 June 2013

My First Experience with the AGENT Smartwatch SDK

If you follow the smartwatch industry at all, it’s likely you’ve heard of at least a couple of up and coming offerings.  One is the Pebble smartwatch, one of Kickstarter’s great success stories.  This project had an initial goal of raising $100,000 and ended up raising over $1,000,000!  I backed the Pebble project and was super excited when it showed up a few months ago.
Although I don’t use an iPhone for day-to-day use (I really love my Nokia Lumia 920), I do own one so I was able to link it with the Pebble and play around.  After trying out several watch faces, and a few apps, I really wanted to create some watch faces of my own.  However, Windows Phone is not currently supported (nor do I know if they have any concrete plans to support it).  I do have my iPhone but I don’t own a Mac so I can’t develop software for the iPhone (Xcode doesn’t run on non-Mac platforms).  I don’t own an Android phone and I really don’t feel the need to purchase one just to create apps for the Pebble.
This is where another Kickstarter project comes in – the AGENT smartwatch.  This project also had an initial goal of $100,000 and managed to raise just over $1,000,000 during the funding period.  What I really like about this watch is that it supports Windows Phone (as well as iOS and Android) and that it’s SDK is based on the .NET Micro Framework.  I don’t exactly need another smartwatch, but this one will support my phone (assuming it actually makes it to production) as well as my geeky urges, so, what the hey!? I decided to go ahead and back the project.
agent-smartwatch
In the meantime, while I’m waiting (months) for my AGENT to show up, I can start experimenting with apps and watch faces now with their AGENT SDK.
Developing watch faces for the Agent watch, which currently run only on an emulator because you can’t get an actual watch yet, is fairly straightforward.  However, before you start, you need to download a few tools.
  1. Visual Studio 2012.  Any edition of Visual Studio 2012 will work – even the free Express edition.
  2. The .NET Micro Framework SDK v4.3.
  3. The AGENT SDK v0.1.1 (June 2013, Preview Release).
Once you’ve installed the above tools, you will see a new set of AGENT templates within Visual Studio:
image
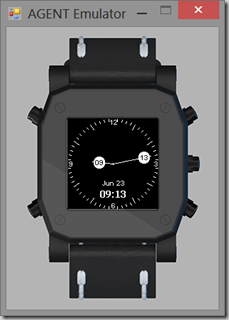
The AGENT Watch Application template provides a simple “Hello World” starter application whereas the AGENT Watch Face template provides a simple digital watch.  Once you create a new project based on either of these templates, you can immediately run the application (by pressing F5) within the AGENT Emulator.  Here is the AGENT Watch Face template running straight “out of the box”:
image
This is a very basic app but it does provide a starting point.
In my case, I wanted to design a watch face that might be used to help younger children learn how to read analog watch and clock dials. Before I started, I sketched out a simple mockup of what I was thinking:
WP_20130624_001 (2)
Not very artistic, I know :-)  However, it provided me with a visual and gave me a goal for my first custom watch face for the AGENT smartwatch.
Though I’m not going to go into the code in this post (I’ll save that for subsequent posts) the final result ended up looking something like this:
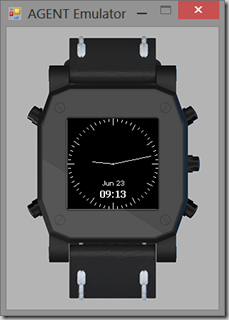
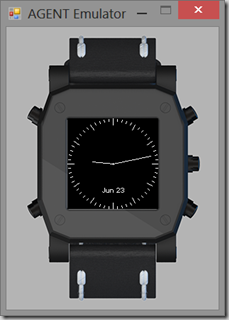
2013-06-24_1457352013-06-24_1457432013-06-24_145750
I designed the watch face to have three modes: “Easy”, “Moderate”, and “Advanced”.  You can cycle through the modes by pressing the middle, right button.  The “Easy” mode provides visual indicators on the hands making it very easy to see what they represent.  There are also numbers at the four main positions on the watch face (the final version would like have all 12 numbers) as well as a digital readout of the time at the bottom.
The “Moderate” mode removes the visual indicators from the hands as well as the numbers from the dial leaving only the digital readout for hints.
“Advanced” mode removes all visual indicators leaving only the hands and the date.
This watch face could definitely stand to be polished a little and it likely will be before the AGENT smartwatch is shipped (to backers) later this year.
If you would like to create your own watch faces and/or apps for the AGENT smartwatch, here are a few links to help you get started.  I will be posting more information as well but these are great starting points.
I have no intentions of getting rid of my Pebble – I still hope for Windows Phone support some day – but at least I now have an easy outlet for my desire to build smartwatch apps and watch faces.  All I need now is just a little more… time :-)

08 June 2013

Demystifying Microsoft’s Git Offering

Although Microsoft is definitely late to the distributed version control (DVC) game, they’re pretty much in the game now and their DVC offering is only getting better. In order to provide distributed capabilities within its current version control offering, Team Foundation Server, the Visual Studio team had to make a decision: build something brand new (possibly proprietary) or build on one of the standard DVC platforms. They decided to go with the latter and build upon Git. A great decision as far as I am concerned.

But, Before That…

Before we get to the Visual Studio offering, let’s take a look at CodePlex. If you’re not familiar with CodePlex, it is Microsoft’s free open source project hosting site. Here, you can create projects to share with others around the world as well as download open source software. In March, 2012, Microsoft made available the capability to create Git-based repositories within CodePlex.  With this, developers now have the capability of choosing between a centralized version control repository, a la TFS, or a distributed version control repository via Git (or Mercurial, which actually came before Git but isn’t nearly as popular).

Moving Forward

Fast forward about ten months and Microsoft announces Git support for Team Foundation Service (TFService, their hosted TFS offering). This update provides a 100% compatible Git repository option for TFService. Not only does this provide typical Visual Studio developers with a great DVC option for TFService it also makes the TFService option much more attractive for non-Visual Studio developers by providing simpler integration for tools such as Xcode.

Along with Git in TFService, Microsoft also provided the Visual Studio Tools for Git. This extension provides Git integration within Visual Studio 2012. If you plan to utilize Git-based repositories within Visual Studio 2012 then you will need to install this extension. Something to note is that this extension allows Visual Studio to work with any standard Git repository such as GitHub, not just TFService.

Still Some Confusion

One of the biggest Git-/Visual Studio-related questions I get today is, what is the difference between the Visual Studio Tools for Git and Git-tf?

The Git-tf command line tools were announced in August, 2012 with the intent of giving developers the capability of using a local Git repository for development that could then be synced up with a TFS repository. In simple terms, you can use Git-tf to clone TFS into a local repository which could then sync your local commits back into TFS. Essentially, it provided a bridge between TFS and clients and/or developers that preferred to work with (or could only work with) Git. Until now, this was essentially your only option for using TFS with tools such as Xcode.

Visual Studio Tools for Git is a Visual Studio Extension (not a set of command line tools) that provides a set of context menus exposing typical Git operations such as Clone, Push, Pull, and Fetch. If you prefer to work within the Visual Studio IDE (as opposed to the command line) then you definitely want to install this extension.

Cheat Sheet

The graphic below depicts the tools you can use to access TFVC as well as TF-Git repositories from various clients.  There are two items to note with this image:

  1. As announced by Brian Harry, Git will be supported in the on-premises version of TFS 2013 starting with the preview version to be released at this years //Build/ conference.
  2. Although TF-Git repositories are depicted, you can substitute any standard Git repository (e.g. GitHub).

image

26 May 2013

Surface Pro as My Main Computer/Tablet

I have been developing on a Dell XPS M1530 laptop for nearly 5 years now.  It has been nothing short of a great laptop.  However, as you can guess based on its age, it is a bit dated by today’s standards.  A couple of months ago, I acquired a Microsoft Surface Pro (128BG version) and had been wondering if it might be beefy enough to replace my Dell.

Last week I had the opportunity to try my Surface Pro out in a development scenario so I thought I’d give it a try.  I installed Visual Studio 2012 w/Update 2, ReSharper (the latest version), and StyleCop.  I also included the latest suite of Telerik controls for Windows Phone 8.  I then spent two full days working on a new Windows Phone 8 application (for an internal innovation event at my place of employment).  In short, here is what I discovered:

  • The Surface Pro is more than capable of running Visual Studio 2012 with various add-ins installed.  The Surface Pro was much more responsive than my current Dell XPS M1530.  Granted, it is no match for the latest, top-of-the-line laptop or workstation, but it’s better than what I’ve been used to for the past four or five years, so it’s a huge improvement for me.
  • Running the Windows Phone emulator on a Surface Pro is an awesome experience.  Rather than interacting with the emulator with a mouse (as you would normally do on a laptop) you can simply use your fingers like you would on an actual phone.  In fact, I didn’t even think to try this until day 2 of my development (I had been using the mouse until then).  Once I tried it, I had no idea why I wasn’t using touch all along.
  • Using a Bluetooth mouse with the Surface Pro seems natural.  I found that I used the mouse as well as touch continually as I developed.  I used touch when it made sense (such as with the phone emulator) and the mouse where it made sense (such as with Visual Studio).
  • I used the Microsoft Surface Type Cover the entire time I was developing and found that I typed on it almost as quickly as I did on a full-size keyboard.  I really only slowed down when I used some of the navigational keys (e.g. Home, End, etc.) that were not located in their usual location.  I also slowed down a little with the Function keys because you have to use the “Fn” key in conjunction with them on the Type Cover keyboard.
  • Although you can develop on the Surface Pro’s 10” screen, I wouldn’t want to do it full time.  Had I been sitting at my desk during this event, I likely would have hooked up to an external monitor.

Based on this experience, I decided it was time to switch to the Surface Pro as my full-time computer/tablet at home.  However, since I had no desire to stare at a 10” screen for hours at a time, I decided to get a USB 3 dock to connect to my other peripherals.  After some initial research, I ended up selecting the Toshiba Dynadock Docking Station (PA3927U1PRP).  This particular model had everything I was looking for: good reviews from other customers, support for USB 3, dual monitor support, and a headphone jack in the front of the unit.  A co-worker has been using a Targus USB 3 Dock for a couple of months now with good results as well.  I ended up choosing the Dynadock mainly for its form factor.

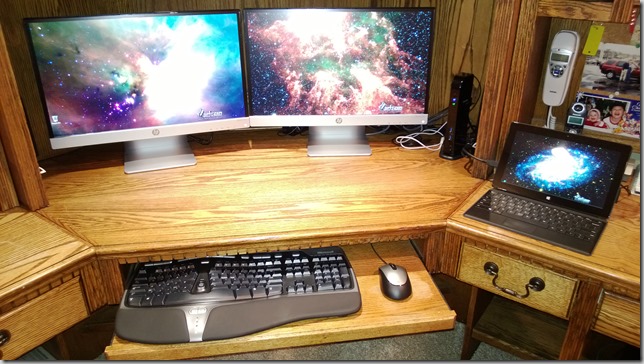
In the screenshot below, you can see the Surface Pro on the right with the Dynadock between the surface and the two monitors.  I have a wired keyboard and mouse connected to the dock along with speakers and a subwoofer (5.1 surround sound is supported) and the two monitors (one is connected via HDMI and the other DVI).

WP_20130526_010

So far I have been very happy with this setup.  At one point, I had a Netflix movie playing on the left monitor and a Hulu show playing on the right monitor with no distinguishable degradation in video performance (the sound from each show was mixed as well without any noticeable “garbling”).

One other item of note… When using Windows 8 (Surface Pro or any other laptop/workstation) I highly recommend getting a copy of Stardock’s ModernMix.  This application is a must have when using multiple monitors and it’s only $4.99 (USD) so it’s very affordable.  ModernMix allows you to run Windows 8 Store apps in a “windowed” environment giving you the ability to move Windows 8 Store apps from screen to screen.  Without ModernMix, your Windows 8 Store apps are pretty much isolated to running on a single screen – and only if you’re not currently interacting with the Desktop.

It is still too early to determine if this setup will end up being ideal but, so far, I am enjoying having better performance than I was having with my previous laptop and now I’m ultra portable in that I only need to unplug the USB connector from the Surface Pro (and power plug, if it’s plugged in) and I’m ready to go.

If it doesn’t slip my mind, I will report back in about six months or so with an update on how, or if, this configuration worked out.

07 May 2013

ALM Readiness Treasure Map Update–Tracking Progress

If you don’t follow the various ALM Rangers Solutions, you should!  If you do, then you already realize there is a lot of content put out by the various ALM Rangers project teams. In fact, there is so much information provided by the ALM Rangers that they have provided a Windows 8 app to help navigate the ever-changing waters of available content – the ALM Readiness Treasure Map.

Download Windows Store app
[If you’re running Windows 8, click the above image to install the app now]

Coming Enhancements

Although version 1 of the app has seen a lot of use, there is much room for improvement.  That said, there is currently a team of ALM Ranger pirates currently hard at work on implementing many of the proposed enhancements for version 2.  One enhancement in particular is the ability to track the status of each guidance document (referred to as jewels within the app) as you make your way through the treasure map.

If you take a look at one of the proposed screen mock-ups below (click here if you’re interested in seeing the rest of the mock-ups), you’ll notice just after the title the text “1/15 completed”.  This implies that you have flagged one of the guidance documents within this section as having been read.  With this update, we plan to track three states in regards to document status, including:

  1. Not Started – you have not yet viewed the document
  2. Started – you have started viewing the document but have not yet completed it, depicted graphically by an open, yet empty, treasure chest (as seen below)
  3. Completed – you have completed viewing the guidance document, depicted graphically by a filled treasure chest (as seen below)

QUESTION: We have gone back and forth on whether or not a guidance document should be automatically flagged as having been “Started” once you click on the link within the app to view it.  As you can see in the mock-up above, there is a context menu that allows you to manually flag a document as having been “Started” (amongst other states).  We are considering making this an app preference where you get to decide how it works.  However, we don’t want to make something that should be simple, complex.  If you have a strong opinion one way or the other, let us know in the comments below.

As a document’s status is updated, the app will utilize the built-in data roaming features of Windows 8 to synchronize the status across your Windows 8 devices.  So, if you start viewing a document on your Windows 8 laptop and move to your Windows 8 tablet, the correct document status will appear on the tablet as well (assuming you’re using the same Microsoft Account on both devices).

Design Details

The following details outline the changes to be made to the source code to support the tracking features described above.

Data Layer (Data Providers)

TreasureMapDataModel.xml

  • Add ID attribute to <guidance/> element and populate with unique integers (consider grouping by category - e.g. "Prepare" = 0-999, "Quick Intro" = 1000-1999, and so on...).  The ID is currently assigned dynamically when the data structure is loaded.  However, since we'll be syncing up document Status each time the app is ran, we need to ensure the IDs don't change.  For this reason, we need to add them to the data.

DB.cs

  • In LoadDB method, replace uniqueGuidanceCounter with newly added ID attribute from above.

Business Logic Layer (View Models)

Status.cs

  • Create Status.cs which simply contains a new enum:

public enum Status {
     NotStarted = 0,
     Started = 1,
     Completed = 2
}

Guidance.cs

  • Add a read-only Status property of type Status.  This property will be read only to force updates to go through the StatusManager (below) where the overall status values will be kept up to date.

StatusManager.cs

This is a new class used to encapsulate some of the logic necessary to set guidance status as well as return various guidance status based on categories and projects.  This class would be surfaced through the DB class because a) it is always in scope (via the App class) and b) this would allow the StatusManager class to be provided with a reference to the DB class which has references to the categories and projects needed for status counts.

Properties:
These properties would be calculated once (via the private methods below), during the initialization of the StatusManager class.  After initialization, they would be kept up to date as the SetStatus method is called.  This alleviates the need to continually walk the data hierarchy as the counts are displayed via data binding.

    • int CompletedProjectCount
    • int CompletedDocumentCount
    • int ProjectDocumentCount
    • int TotalCompletedCount

Methods:
[-] = Private; [+] = Public  

    • -GetCompletedProjectCount(int category) - gets the total number of projects, for a given category, where all guidance documents have a Status of Complete (2).  Used for displaying completed ratio on the "category" page.
    • -GetCompletedDocumentCount(int project) - gets the total number of guidance documents, for a given project, that have a Status of Complete (2).  Used for displaying completed ratio on "projects" page.
    • -GetProjectDocumentCount(int project) - gets the total number of guidance documents for a given project.  Used for displaying completed ratio on "projects" page.
    • -GetTotalCompletedCount() - gets the total number of guidance documents, across all categories and projects, that have a Status of Complete (2).  Used for displaying overall percentage (on tile).
    • +SetStatus(int guidance, Status status) - sets the current status for the specified guidance ID.  Used by the "Mark as" menu for "Not started", "In progress", and "Completed".
    • -Save() - saves the current state of the various document Status values to "roaming" storage.  This would be simply serializing a List<Dictionary<GuidanceID, Status>> for simplicity.  This method would be called, asynchronously, each time the SetStatus method is called.
    • -Load() - loads the current state of the various document Status values from "roaming" storage.  This would happen during initialization of the StatusManager class.

UI (Views)

Projects.xaml

  • Capture Tapped event for "jewel" hyperlinks and set Status for selected guidance document to Started (1) unless it's already been marked as completed.  Question - do we want to automatically mark something as Started the first time it is opened or do we want to purely rely on the user to mark it via the menu option?

More Information

01 May 2013

TFS Live app for Windows Phone

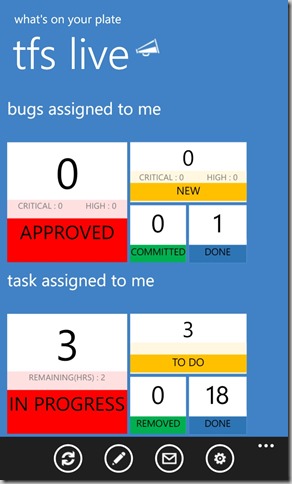
If you happen to 1) work with Microsoft’s Team Foundation Service (TFService) or another publically accessible TFS server and 2) own a Windows 8 Phone, then you will want to check out the tfs live app for Windows Phone. The tfs live app provides quick, at-a-glance totals for the various types of work items you’re most interested in.

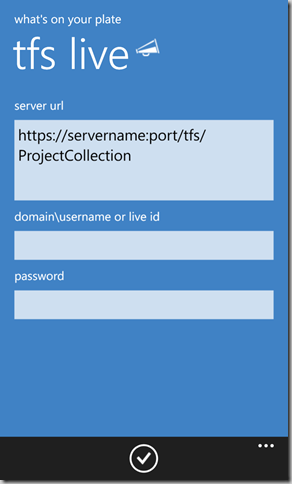
When you install the app and run it for the first time, you will have to configure the app to connect to your TFS server:

wp_ss_20130501_0001

Although a template has been provided for the server URL (as shown in the above image), it is not the best template to follow if you’re connecting to a TFService instance.  In this case, use the following template:

     https://{account}.visualstudio.com/DefaultCollection – replacing {account} with your specific TFService account name.

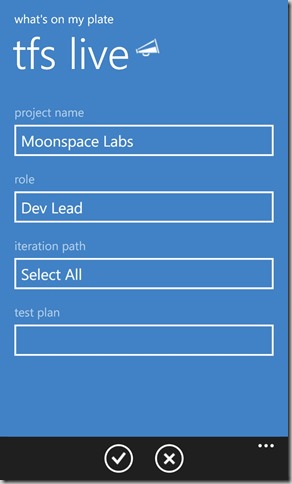
Once you have successfully logged on, you will need to select a project name, role, and a couple of other options:

wp_ss_20130417_0002

The selected role determines which queries will show up on the main screen. The roles that can be selected from include:

  • Developer – provides: “bugs assigned to me” and “tasks assigned to me”
  • Tester – provides: “bugs assigned to me”, “test cases assigned to me”, and “tasks assigned to me”
  • Dev Lead – “bugs assigned to me”, “tasks assigned to me”, and “overall bug summary”
  • Test Lead – “bugs assigned to me”, “tasks assigned to me”, “overall bug summary”, and “overall test summary”
  • Manager – “overall task summary”, “overall bug summary”, and “overall test summary”

The image below shows the screen for a Developer role:

wp_ss_20130417_0004

Tapping on any of the query icons (on the screen above) will open a custom query (based on the specific type of query being ran) in the web browser displaying the appropriate work items.  This experience is less than ideal but it does work.  I would really like to see the query results come back to the phone and displayed in a list that, when tapped, would then open the web-based query to view the full details.

That said, I still find this app highly useful for keeping up to date on newly assigned and/or modified work items.  Some suggestions I might offer to the app developer would include:

  • Modify the server URL template to be more TFService friendly (as I’ve shown above).
  • Display the project name (and possibly role) on the main screen.  Currently, you can’t tell which project you’re connected to when looking at the main screen.
  • When selecting role from the settings page, “Devloper” (notice the missing ‘e’) is spelled incorrectly.  Not a major issue but detracts from the overall fit-n-finish of the app.

A PowerPoint slide deck with further details is available from the author here.

05 April 2013

Visual Studio/TFS Update 2 Released

The latest update for Visual Studio 2012 and Team Foundation Server 2012, Update 2, has been released.  There is a lot of new functionality included in this release and rather than duplicate all the details here, I’ll simply refer you to this post on the Visual Studio ALM + Team Foundation Server Blog as well as this link.

I would like to point out the download links:

When you download the update for Visual Studio 2012 and/or TFS, you will notice the installer is quite small (1.3MB or less).  This is because the installer is just big enough to kick off the installation process which will first download only the components required to update your machine in its current state.  This saves you from having to download installation files that you do not need.

However, there are reasons where you might want to download the full installation package before updating your system – e.g. if you plan to share the installation files with other people in your organization.  Luckily, this is a relatively easy process.

To pull down the entire installation set, simply run the update with the /layout switch.  For example, the following command will kick off the download process for the Visual Studio 2012 Update 2 install files:

C:\Downloads>VS2012.2.exe /layout

When you specify the /layout switch, you will be prompted for the folder where you would like the installation files to be downloaded to:

image

Clicking on Download will start the download (‘Acquiring’) process:

image

image

Once downloaded, you can start the installation by running VS2012.2.exe in the download folder.

If you run across any bugs within Visual Studio 2012, TFS, or other Visual Studio products, you can submit them here on Connect.

27 March 2013

//Build/ 2013 Announced

Image

Yesterday, Steve Guggenheimer announced //Build/ 2013.  Here are the details known so far:

Date and Location

San Francisco, CA
June 26th (09:00 PDT) – June 28th (14:30 PDT)
The Moscone CenterGame Developers Conference 2013 is being held there as I write this.

Registration opens at 09:00am PDT, April 2, 2013
Early bird (first 500): $1,595 // Full: $2,095

If you happened to attend //Build/ 2012 (last November) then you no doubt recall the endless joy of being bussed from one side of the campus to the other (depending on which sessions you wanted to attend).  You might also fondly recall the walk back from the initial keynote in the rain and the mud :-)  This year promises to be a much better experience by hosting the conference within the much larger Moscone Center.  If you’re curious about the size of the Moscone Center, check out these stats.  You can also get some great insight from these reviews on yelp.

05 March 2013

Tracking Home Inventory

About a month ago, I received a message from my sister informing me that her house had been robbed and that pretty much everything of value had been stolen.  Luckily, she wasn’t home when the robbery took place so she wasn’t in any danger of being harmed.  Not everything that was taken can be replaced (e.g. family heirlooms, jewelry, etc.) so we are hopeful that at least some of her valuables will be located.  However, if they are located, she will still have to prove they are hers.  Luckily, she had recorded the serial numbers of the items (e.g. camera, laptop, etc.).  Having the serial numbers recorded does not guarantee that one will get their stolen property returned to them.  However, if your stolen property is recovered, it will definitely increase the likelihood of getting your items back.

A day or two after my sister’s bad news had settled in, I started thinking about what would happen if I were in the same situation (which, obviously, I hope to never be).  I could get to a few serial numbers on-line based on when I originally registered specific items.  However, I did not have an official home inventory list of the valuables throughout our house.  So, I decided to start the list (I spaced the task of filling out the list over the course of a couple of weeks) in Excel.

Rather than create my own home inventory list in Excel, I decided to search the available templates.  Searching for “home inventory” turned up two templates:

image

Creating a new spreadsheet based on this template provides a great starting point for tracking the valuables throughout your house (or office or wherever you want to track an inventory).  The template is easy to use and understand.

However, not everyone has Excel installed and available.  No problem!  With Microsoft’s SkyDrive, you can get access to Microsoft’s Web Office Applications at no charge (i.e. FREE)!  If you haven’t already signed up for a SkyDrive account, I highly recommend it.  The first 7GB of storage space is complete FREE, plus, you also get access to the web versions of Microsoft Word, Excel, PowerPoint, and OneNote!

One thing to consider is that the web version of Excel does not have the same rich set of templates available that you would get in the desktop version.  All that means is that you have to come up with the spreadsheet design yourself.  To make it easier, I’ve already created a Home Inventory Excel spreadsheet (loosely based on the template shown above) and made it publically available to simplify the process.  This spreadsheet looks something like this:

image

Probably the biggest advantage of tracking your home inventory within a SkyDrive-based document is that if your computer is ever stolen (let’s hope that never happens!) you will still have your home inventory (and any other documents you’ve stored in SkyDrive) safe and accessible from practically any other device you have access to.

Also, along with serial numbers, descriptions, cost and value, it is a good idea to take pictures of your valuables as well.  You cannot paste images into a web-based Excel spreadsheet (you can in the desktop version) but you can create a dedicated folder within SkyDrive to store pictures of your valuables (which can be linked to from within your spreadsheet).  Just something else to consider when building out your inventory.
You can download the above Excel-based Home Inventory template from here.

*Full Disclosure: I’m a SkyDrive Insider, ask me about SkyDrive or learn more about the SkyDrive Insiders program here.

16 January 2013

.NET Mocking Framework Survey Results

Two weeks ago, I posted a survey (using Excel Surveys available in SkyDrive) asking you what your preferred/primary .NET mocking framework was. We plan to use this data to help drive out which frameworks we want to evaluate further.

The survey closed yesterday and, out of 147 responses, here is how everything shook out:

image

image

147 responses may not seem like a lot and, in the grand scheme of all .NET developers across the world, it’s not.  There are several ways you can look at this number:  Out of everyone that viewed the survey request, the majority of them didn’t want to take the time to give their input; they don’t use .NET-based technologies and/or mocking frameworks; I just didn’t reach a wide enough audience and/or provide enough time to get the word out about the survey; or there was some other reason they didn’t bother with the survey that I’m just not thinking of at the moment.

In regards to this penultimate point above, here was my general approach for getting the survey link out:

  • Posted to my blog – just over 225 page views (as of a few moments ago) – not a huge number by any stretch
  • Posted to my twitter feed – roughly 250 followers – again, not a huge number. This one is a little harder to judge because I don’t know how many times it was re-tweeted, copied and tweeted, etc.
  • Posted to Google+ – don’t know the impact – likely very, very small
  • Posted on my LinkedIn timeline – 279 connections
  • Posted on two separate LinkedIn groups: .NET Developers & .NET Professional with .NET Developers having a membership of about 148,000
  • Various e-mail distribution lists – not sure of the count

Click here to view the full survey results.

[Updated: Fixed broken survey link]

14 January 2013

Omaha ALM User Group–Inaugural Meeting

The Omaha ALM User Group, formerly known as the Omaha Team System User Group, is having its inaugural meeting tomorrow night, Tuesday, January 15th, 2013.  The Omaha ALM User Group is a technology agnostic group focused on utilizing tools and automation to support the people and processes across the complete application lifecycle.  The group is co-lead by Jeff Bramwell and Mike Douglas.

Our first talk is Creating a deployment framework with TFS and custom PowerShell Cmdlets by Andy Bayer:

As testing and release cycles continue to shorten for developers, automating application deployments becomes almost a necessity.  TFS and WebDeploy provide some very powerful tools to simplify application deployments, but have limits to what can be done.  An excellent way to extend the out-of-the-box deployment tools is with PowerShell, but that can carry a learning curve and become a maintenance headache very quickly.  Enter custom PowerShell Cmdlets - a way to hide all of that 'evil' PowerShell scripting and deployment logic from view, and at the same time, provide one location to maintain for any number of deployments.  If done correctly, this can result in a fairly simple, yet very extensible deployment framework for any organization.

If you would like to join us as we kick off our first session then bounce on over and RSVP.  This meeting is being hosted and sponsored by Farm Credit Services of America and is located at:

4979 South 118th St.
Omaha, NE 68137
Map

You can enter at the north building on the west side.  The meeting will begin at 6:00pm with the food (pizza :-) arriving around 5:45pm.

For more information:

We look forward to seeing you there!

02 January 2013

Which .NET Mocking Framework Do You Prefer?

We are preparing to evaluate mocking frameworks that support .NET to determine if our current mocking framework is still the best solution for us.  Before we actually start the evaluation, we’d like to get a general idea of which .NET mocking frameworks are popular amongst developers out in the rest of the world.

To aid in this endeavor, we have created a simple survey with two questions (or three, depending on how you answer the first question).  Essentially, the survey asks which of the following .NET mocking frameworks is your primary (or preferred) framework.  The list of frameworks is comprised of the following:

  • EasyMock.NET
  • FakeItEasy
  • JustMock (Telerik)
  • Microsoft Fakes
  • Moq
  • NMock2
  • NMock3
  • NSubstitute
  • Rhino Mocks
  • Simple.Mocking
  • Typemock
  • Other (list in comments)

If you select “Other” then the second question is there to list the name.  The third and final question is simply for any general comments you’d like to make.

We plan to keep the survey open until Tuesday, January 15th.  Once the survey has closed, I will post the results back to this blog.  So, please help us determine what the preferred mocking frameworks are that are in use today.  The survey should (literally) take less than 30 seconds.  Your contribution will be greatly appreciated!

This Survey is Now Closed.  Click Here to view the final results.

Also, please take a moment and pass the word by tweeting, blogging, etc. the above survey link (or the link to this post).  The more responses we get, the better.

01 January 2013

A Backup Strategy

Anyone using computers for any amount of time knows that backups are a must.  We’ve all heard or read that it’s not if your hard drive fails but rather when your hard drive fails you’ll wish you had backed up your files.  However, history has taught me that it’s not always a failed hard drive that makes me run to my backups but the more likely catalyst is my own actions.  For example, have you ever re-imaged a computer, thinking you’ve backed up everything you considered important, only to realize five minutes after installing the operating system that you forgot to include something really important in the backup set?  I have! :-)

So, with the new year starting, now is a great time to think about a backup strategy.  Even if you have a backup strategy, it’s still a good idea to review your backup process to ensure everything that needs backing up is actually getting backed up.

If you have ever researched backup strategies it’s no doubt that you have heard of the “backup rule of three” also known as the “backup 3-2-1” rule.  I have no idea how long this rule has been around as I can’t seem to locate the origin.  It essentially states the following when creating data backups:

3. Keep three copies of everything you intend on backing up.
2. Maintain your backups in at least two different formats (e.g. hard drive and memory stick, cloud storage and DVD, etc.).
1. Ensure at least one copy is kept off-site (e.g. in case of a disaster such as a flood or fire).

Based on these rules I have made use of the following technologies to satisfy my backup needs:

  1. SkyDrive – If you are not familiar with Microsoft’s SkyDrive service, you should definitely check it out.  You are provided with 7 GB of on-line storage space for free – 25 GB if you happened to get in on an upgrade deal that was offered a few months back (plus another 100 GB if you happened to attend this year’s //Build/ conference).  SkyDrive also comes with free use of Microsoft’s web-based Office products including Word, PowerPoint, OneNote, Excel, and Excel Surveys.  If 7 or 25 GB is not enough space, you can pay to upgrade your space.  There are also mobile clients available for Windows Phone, iPhone/iPad, and Android-based devices.  For more information regarding SkyDrive and its features, click here.

    In my case, I use SkyDrive to store my various documents including Word and PowerPoint files, all my photos and music, and miscellaneous other files.  Pretty much anything that I would like to have easy access to from any device I may be using.  I do not store my videos on SkyDrive, however, due to their large size.

  2. Windows 8 Storage Spaces – Used in conjunction with a local machine running Windows 8 Pro (the only “tower” PC on my home network), Storage Spaces provides added protection through mirroring or parity.  In my case, I have three physical hard drives tied together via Storage Spaces using parity (~RAID 5).  If any of the three drives fail, I can replace the malfunctioning drive and the missing data will be restored automatically.  Also, if I need to add more storage to my server, I can simply install a new hard drive and add it to the Storage Spaces pool.

    This server is used as a central location for all backups on my home network as well as the primary storage location for all photos, music, and videos.

  3. Carbonite – Similar to SkyDrive, Carbonite offers cloud-based storage.  However, Carbonite is designed and built from the ground up for backup purposes.  Carbonite’s pricing plans are very attractive as well, starting at only $59/year for unlimited storage space (for one PC).  One of the best features of Carbonite is its simplicity.  For the most part, you simply install it, sign in to Carbonite, and forget it.  However, by default, video files are not backed up (note that videos are automatically backed up with the Home Premier service).  However, it’s a simple matter of right-clicking the video files and telling Carbonite to back them up.

    I use Carbonite to backup my Windows 8 Pro machine – which contains all the documents and files that I care about.  Depending on how many files you have to backup, it can literally take days (weeks?) to perform the initial backup.  However, once the initial backup has been completed, new files or modifications to existing files are backed up quickly.  In the case you ever need to restore lost or damaged files the restore process can also take an extended amount of time based upon the overall size of data that needs to be restored.  If you anticipate the need to restore large amounts of data, Carbonite offers a courier service as part of their Home Premier plan in which case they will mail you a copy of your data on physical media.

The following diagram provides a general overview of how the above technologies are tied together:

image

With all that said, does my approach satisfy the “Backup 3-2-1” rule?  Let’s see…

3. Keep three copies of everything you intend on backing up.  Yes.  I have copies on my local file server, in SkyDrive (with the exception of videos), and within Carbonite.  I suppose I’m skimping a little bit here with videos but I am also banking on Carbonite to take reasonable steps to ensure they don’t lose my backups on their end.
2. Maintain your backups in at least two different formats (e.g. hard drive and memory stick, cloud storage and DVD, etc.).  Yes.  I have backups on local hard drives as well as two separate cloud services.
1. Ensure at least one copy is kept off-site (e.g. in case of a disaster such as a flood or fire).  Yes.  I am utilizing two separate cloud services.

So far this backup approach is working for me.  Although I believe it is a good approach it is by no means the only approach or even necessarily the best approach.  As with most processes out there, use what works for you and throw the rest out :-)  If nothing else, hopefully this post will at least get you thinking about backups and implementing a solution before you actually need it.

What backup strategy are you using?  If you have some great ideas, please let us know in the comments below.

GPZZ3W7658KG