29 February 2008

PowerCommands for VS 2008

A short while ago I wrote a post about the MSDN Code Gallery.  For all intents and purposes I liked what I saw with a few exceptions (nothing major).  I even posted a simple Send Email Message snippet just to try it out. 

Today, I noticed a new post that I think will prove to be very useful to many Visual Studio 2008 users - PowerCommands for Visual Studio 2008.  This is a set of extensions for the Visual Studio 2008 IDE that offer various types of functionality, including:

  • Collapse Projects
  • Copy/Paste Class
  • Copy/Paste References (this will be hugely popular in my opinion)
  • Copy As Project Reference (another popular one)
  • Edit Project File
  • Open Containing Folder (very nice!)
  • Open Command Prompt (also very nice!)
  • Unload/Reload Projects
  • Remove and Sort Usings (C# only)
  • Extract Constant
  • Clear Recent File/Project List (yet another popular one)
  • Transform Templates
  • Close All

You can download the MSI, a Microsoft Word 2007 "read me" document, and/or the source code.  I installed the MSI, ran Visual Studio, and was able to access the new functionality without any issues.

This set of extensions will no doubt become popular among Visual Studio users.  With any luck, new features will be added along the way :-)

Click here to visit the PowerCommands for Visual Studio 2008 home page.

TFS 2008 Setup/Admin FAQ

A new forum post has been added to the Team Foundation Server - Setup forum titled TFS 2008 Setup and Administration FAQs.  The intent of this forum post is to deliver commonly asked questions and answers relating to the setup, configuration, and administration of Team Foundation Server 2008.  The post has been "pinned" to the top of the forum so it's easy to find.

Here is a list of questions that are answered in the post as of the time of this writing:

  • When installing a new Team Foundation Server, is there a way to use an existing SharePoint Web Application?
  • When creating a new TFS Project, is there a way to use an existing SharePoint site collection?
  • When creating a new TFS Project, is there a way to create a sub-site under an existing SharePoint site collection?
  • Why is it important to uninstall Team Foundation Server 2008 beta releases prior to installing Team Foundation Server 2008 RTM release?
  • Why is it important to uninstall Team Foundation Server 2005 from the data-tier server prior to installing Team Foundation Server 2008 in a dual-server configuration?
  • Is Team Foundation Server 2008 supported on Windows Server 2008?
  • Is Team Foundation Server 2005 supported on Windows Server 2008?
  • Is Team Explorer 2005 compatible with Team Foundation Server 2008?
  • Is Team Build 2005 supported on Windows Server 2008?

See the post for answers to the above questions and be sure to bookmark the site as it's surely going to grow.

Also, while you're there, check out the other post that's "pinned" just below the FAQ - TFS/Team Explorer 2008 Troubleshooting Guide.  This post contains some good tips and workarounds.

18 February 2008

So, what's the deal with $, @, and % anyway?

So, you've decided that the default build script that's built by the "New Build Type" wizard doesn't quite do everything that you need it to do. So, you click on over to the Version Control Explorer, check out the TFSBuild.proj file, and dive in!

At first glance, everything looks simple enough, you have various combinations of Targets, Tasks, and Properties. Things start to get a little interesting as you explore the concept of Item Groups. However, you start to notice a subtle difference with how various properties (or at least what look like properties) are accessed - e.g. some begin with '$', some with '@', and yet others with '%'. What's going on here? What's the difference? Before we can answer this question, we need to take a look at Properties and Items.

Properties
You can think of properties as MSBuild's version of a variable (as you might use it in some programming language such as C#). Once you declare a property, you can use it throughout your build script to reference whatever value it may hold. You create a property by defining an element within a PropertyGroup element. For example:

<PropertyGroup>
<WebBinSource>Binaries</WebBinSource>
</PropertyGroup>

In the above example, the property is named "WebBinSource" and can be referenced in your build script as $(WebBinSource). You can create as many properties within the PropertyGroup element as you like. You can also create as many PropertyGroup elements as you like.

Aside from the obvious advantages of using properties within your build script (i.e. so you don't have to hard-code values in multiple places) another nice feature is that you can pass in custom property values on the MSBuild command line. For example:

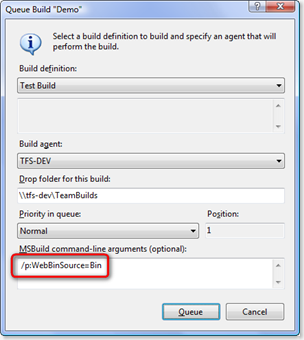
MSBuild.exe MyProject.proj /p:WebBinSource=Bin

These properties can also be specified in the Team Explorer "Queue Build" dialog:

Queue Build Dialog

You can also reference environment variables using the same syntax. For example, you can reference the environment variable PATH using the syntax $(Path). If you declare a custom property with the same name as an existing environment variable, the custom property will override the environment variable and its value will be used when referenced.

MSBuild defines several reserved properties that you can utilize in your build scripts. There are also several customizable properties available within Team Foundation Build for use within your TFS build scripts.

Items
Items allow you to create user-defined collections which can then be used an input arguments for MSBuild tasks. The task can then act on the individual items within the collection as needed. You create an item collection by defining elements within an ItemGroup element. For example:

<ItemGroup>
<SourceFiles Include = "default.aspx"/>
<SourceFiles Include = "register.aspx"/>
</ItemGroup>

NOTE: You can also include multiple items within a single element by separating each item with a semicolon. For example:

<ItemGroup>
<SourceFiles Include = "default.aspx;register.aspx"/>
</ItemGroup>

In this example, the item list is named "SourceFiles" and can be referenced in the build script as @(SourceFiles). For example, you may have a custom task that deploys a collection of files to a web server:

<Target Name="AfterBuild">
<DeployWeb Sources="@(SourceFiles)" />
</Target>

Depending upon the task using the item collection, it may support the use of wildcards in the item definition. You can also change the item delimiter to be something other than the default semicolon for custom processing.

Although items are a useful feature, they're even more useful if you can associate metadata with them.

Metadata
Each individual item contained within an item collection may also contain metadata information. For example, a collection of files to be copied may contain the attributes of each file (e.g. read only, archive bit, etc.) or possibly the creation and last updated date/time.

You can associate metadata with individual items by adding child elements to the individual item elements. For example:

<ItemGroup>
<SourceFiles Include = "default.aspx">
<Copy>true</Copy>
</SourceFiles>

<SourceFiles Include = "Web.config">
<Copy>false</Copy>
</SourceFiles>

</ItemGroup>

Using this example, the following task will copy all web files that have a metadata item of Copy with a value of true:

<Target Name="AfterBuild">
<DeployWeb Sources="@(SourceFiles)" Condition=" '%(Copy)' == 'true' />
</Target>

Also, any time a new item is created, there is a set of "well-known" metadata created and assigned to each item.

Putting it All Together
So, now when you see items prefixed with a '$', you'll know that it's referencing a property whereas items prefixed with a '@' are referencing a collection of items to be processed. If a task (or condition) needs access to the metadata for an individual item (or collection of items) then you will see the metadata items being prefixed with the '%'.

Hopefully this has cleared up the differences between the different types of "variables" in MSBuild and your Team Foundation Build scripts.

References

08 February 2008

MSDN Code Gallery

Although it's been about two weeks since Microsoft launched its new MSDN Code Gallery, I am just now getting around to checking it out.

At first glance, it appears there are quite a few similarities between the MSDN Code Gallery and Microsoft's CodePlex site (another open source site provided by Microsoft and hosted on top of Team Foundation Server).  So, what are the differences between the two sites?  Basically, it boils down to project management: Microsoft's CodePlex site is suited for open source projects requiring some level of project management whereas the MSDN Code Gallery is mainly an on-line repository of code snippets and example projects (without any of the project management functionality).

What I like:

  • The MSDN Code Gallery is a visually pleasing site.
  • Quick and simple site for accessing code snippets (without having to pull down entire projects to get at a small snippet).
  • "Tagged" resource pages allowing for simple categorization of code snippets and examples.
  • Creating a new resource page is relatively easy.

What I don't like:

  • Not a lot of content.  As of a few minutes ago, there were only 75 "resources" available for download on the site.  However, this is still a new site and I'm sure it will grow a lot over time.
  • Figuring out the navigation and search features takes a little getting used to.  It's nice once you figure it out but is not intuitively obvious.
  • You must have a Windows Live ID (formerly known as Microsoft Passport) to create new resource pages.  The CodePlex site does not have this "limitation" (possibly due to the integration issues with TFS).
  • The instructions for setting up the resource page (correctly) and publishing it are not clear.  I followed the instructions and published my first code snippet (for sending e-mail messages in C# or VB.NET) only to receive an e-mail message a few hours later telling me that my resource page "appeared" to still be in testing - which it wasn't.  I've sent an e-mail asking for specific details as to what the actual problem is so I can get that corrected.
  • The only license model available is the Microsoft Public License (Ms-PL).  This license is fairly permissive (no pun intended) but what does it hurt to have a few more choice (similar to the CodePlex site)?
  • The search functionality is fairly basic.  Having some extended search features such as language choice (e.g. C#, VB.NET, JavaScript, etc.), submission date, etc. would be beneficial.  The krugle search engine does a good job in this area (as an example).

I've always tried to make use of example source code snippets as I develop software just so I don't have to re-invent the wheel.  However, a lot of the source code resources on the web tend to have an abundance of poorly written/tested snippets or the snippets are out of date.  I will be interested in seeing how Microsoft deals with this issue over time (if at all).  Until then, I'll enjoy yet another snippet repository.

Follow Up: I received some more details about why my resource page "appeared" to still be in testing... Basically, I was told that my resource page needed to be "spruced" up with a little more information.  I must admit that my initial page was pretty sparse, but let's face it, a simple "send e-mail" snippet doesn't take a lot of explanation.  However, I can understand Microsoft's viewpoint that they do not want a lot of mostly-empty (or "ugly") pages comprising the MSDN Code Gallery.  So, I've updated the SendEmail resource page to hopefully meet the (not-so-well-documented) publishing requirements.

06 February 2008

Working with the BuildStep Task

One of the new convenience tasks added to Team Foundation Build 2008 is the BuildStep task.  This task allows you to add custom messages to the build reports created when you run a team build.  For example, you may want to display the message "Publishing web site" while your build script is updating some files on a web site.  Having the ability to "see" what your build script is currently executing is not only useful but can also be a great debugging tool (the messages are also logged as well as being displayed).

The BuildStep task accepts the following parameters:

  • TeamFoundationServerUrl - specifies the Team Foundation Server URL.  For example: $(TeamFoundationServerUrl).
  • BuildUri - specifies the build URI - for example: $(BuildUri).
  • Name - specifies the name of the build step added by this task.  NOTE: this parameter appears to be optional - i.e. it works just fine with or without a Name being specified.
  • Message - specifies the text of the message to be displayed within the build report.
  • Id - specifies the optional input/output parameter. If specified, this is the ID of the build step that is updated. If not specified, a new build step is created.
  • Status - specifies the status for the build step.  For example, Succeeded, Failed, or Stopped.

There are several variations in how you can implement the BuildStep task.  I've listed two of the more common scenarios below:

Simplest Scenario - Add a Message
The simplest scenario involves just adding a build step message to the build report with a status of "Succeeded".  To do this, use the following pattern (note: the target "PackageBinaries" is used for illustration purposes only - the task can be utilized from within any target you wish):

<Target Name="PackageBinaries">
  <BuildStep TeamFoundationServerUrl="$(TeamFoundationServerUrl)"
             BuildUri="$(BuildUri)"
             Message="Publishing web site"
             Status="Succeeded" />
</Target>

This will display the text "Publishing web site" in the build report:

buildStep_1

You can leave off the Status parameter, however, the icon displayed next to the build step will not indicate a completed task.  If you leave the Status parameter in, then the status icon will indicate a completed task as soon as the build step is displayed, even if the task has not yet completed.  To present a more accurate indication of what's currently executing, use the next template.

Complete Scenario - Display Actual Status
Ideally, you would want to display the icon that indicates a build step is executing until the step has completed and then change the icon (and optionally the message) to a "completed" status.  To do this, use the following pattern:

<Target Name="PackageBinaries">
  <BuildStep TeamFoundationServerUrl="$(TeamFoundationServerUrl)"
             BuildUri="$(BuildUri)"
             Message="Publishing web site...">
    <Output TaskParameter="Id" PropertyName="MyBuildStepId" />
  </BuildStep>

  <!-- Long running task goes here... -->
  <BuildStep TeamFoundationServerUrl="$(TeamFoundationServerUrl)"
             BuildUri="$(BuildUri)"
             Id="$(MyBuildStepId)"
             Message="Web site published"
             Status="Succeeded" />
</Target>

In this example, we're tracking the ID of the newly created build step (in the property MyBuildStepId) so we can use it in a subsequent BuildStep task to set the status icon to "Succeeded" and update the build report text.

buildStep_2

NOTE: You can leave the Message parameter off in the second BuildStep task in the above example if you want to leave the original message text unchanged.

Although this is a new addition to the TFS 2008 release, you can get similar functionality for TFS 2005 by using a custom build task.  One example of such a custom build task is available here.

05 February 2008

10 Reasons for TFS with Small Teams

Over the past year or two I've read and heard, on multiple occasions, comments along the lines of "our team is not big enough to justify Team Foundation Server" or "we don't have the need for TFS". Contrary to these perceptions, Team Foundation Server can provide a lot of benefits - even for small development teams.

Here is a list of ten reasons for using TFS with small development teams (in no particular order):

  1. Version Control - no matter how small or big your development team and/or project is, everyone eventually loses source code for one reason or another (e.g. power/network outage, hard drive crash, human error, etc.). Along with the ability to backup source code (and other project "artifacts") a good version control system (like the one built into TFS) allows you to version your source code, apply labels, and perform branching/merging operations. The version control system built into TFS utilizes Microsoft SQL Server as its data store which allows for easy backup and restore operations.
  2. Automated Builds - a lot of time is spent on the actual development of a product. However, unless you "package" your product for deployment/publishing, then you're only half way there. TFS allows you to create automated build scripts that will build the latest version of your source code, in a clean environment, and (optionally) perform various tests against the source code, build installation packages, deploy files (e.g. web sites, MSI packages, etc.), publish build reports, etc.

    With TFS 2008 you also have the option to setup Continuous Integration with the click of a button or schedule a specific build type to run at a pre-designated time (e.g. "nightly" build). Frequently running an automated build script provides a certain amount of assurance that you can deploy/ship your product with limited notice.
  3. Work Items - anyone that's ever been involved in the software development process (no matter the size) has created various types of lists. For example, a list of requirements, a list of defects, a "wish" list, etc. There are at least two down-sides to these lists: lack of tracking and lack of workflow.

    TFS allows you to create Work Items which, out of the box, are things like Bugs, Tasks, Scenarios, Risks, etc.. You can also modify existing work item types and/or create your own (e.g. to more closely match your development practices). These work item types also have the ability to define a workflow so that the work item can move from one state to another in a controlled fashion.
  4. Documentation Management - regardless of the size of your project or the type of software development methodology you're using, you will no doubt create some documentation along the way (even if it's as simple as installation instructions). TFS utilizes Microsoft Office SharePoint Services (MOSS) to store and manage documents related to your project. In fact, the Team Explorer Client that integrates with Visual Studio gives you direct access to your SharePoint documents directly from within Visual Studio.
  5. Unit Test Integration - although you can create and run unit tests in Visual Studio without the use of TFS, by automating your unit tests within a TFS-based build, you can track the progress of unit tests over time and publish each test run to TFS (e.g. so that it can be viewed within various reports and/or the TFS SharePoint site).
  6. Code Coverage Integration - like unit tests, you can get code coverage manually within Visual Studio. However, by including code coverage in your TFS-based builds, you can track code coverage over time and view the results within various reports and/or the SharePoint portal.
  7. Integrated (Static) Code Analysis - again, like unit tests, you can run static code analysis manually from within Visual Studio (e.g. via FxCop). However, having the ability to enforce code analysis rules at the time your source code is checked in and/or built, you can add another level of quality control to your project.
  8. Distributed Development - you may end up on a project, even with small teams, where the team is physically distributed - e.g.. home vs. work, work vs. another country, etc. This physical separation can introduce many challenges for developers (e.g. source code concurrency/consistency, updating documentation, modifying work items, performance issues, etc.). TFS was built from the ground up with this challenge in mind. You may have TFS installed at your company's office but can still connect to it using the Team Explorer client from your home (assuming the TFS server is accessible via the Internet or VPN).
  9. Overall Integration - all of the features listed above can be cobbled together using other Microsoft, open source, or 3rdparty products. However, what this type of environment would lack is the overall integration provided with TFS. For example, you could use NUnit for running unit tests and possibly utilize CruiseControl.NET to implement your build process. However, how would you publish the unit test results to a web site for later review? How easy would it be to provide a history of those results?
  10. Cost (sort of) - one of the more common reasons you hear when justifying the use of open source software is the price - i.e: free. However, "free" doesn't always come without cost. Without the integration provided by TFS, you will no doubt be spending a good amount of time "wiring" various technologies together to gain similar functionality.

    With TFS, you spend a lot less time on integration issues and more time concentrating on developing and increasing the overall quality of your product. If the features listed above can save your several hours of manual effort a week or possibly reduce the defect rates of delivered products, what's that worth?

    There are basically four Team Foundation Server products:
    • Team Foundation Server Trial Edition - this is a fully functional 90-day trial edition. If you want to give TFS a try, you can download the trial edition here.
    • Team Foundation Server Retail Edition - this is the "full" version of TFS with a price starting around $2,000 (and going up, depending on your specific needs).
    • Team Foundaiton Server Volume License Edition - this is basically the same as the Retail Edition, only it's obtained differently.
    • Team Foundation Server Workgroup Edition - this is a 5-user version of Team Foundation Server with the same functionality of the full version. This version is included with the "Team System" editions of the MSDN Premium subscription. So, if you (or your company) already has one of the "Team System" MSDN Premium subscriptions, then you already have this edition - so why not use it?

For more details about the different versions of Team Foundation Server, check out this post.

This list only scratches the surface of what's available within Team Foundation Server and the benefits it can provide to teams of all sizes. As TFS matures and approaches the next release ("Rosario") the features will only improve and the benefits will increase.

Displaying Quality Indicators

A few days ago, I put an article together for Paul Hacker's TFSTimes.  The article, Displaying Quality Indicators on your TFS SharePoint Site, discusses usefulness of the Quality Indicators report that ships with Team Foundation Server and how to add it to your project's SharePoint Site.  The article also describes how to modify your build types to automatically run all unit tests as well as how to include code coverage statistics with your build.

You can read the article on-line here until the next issue is posted.  The archived PDF version is available here.